Photomatix for Linux
Recently HDRsoft released Photomatix for Linux. With an introductory price of 19.50€, I immediately purchased it.
On occasion, I’ve used LumincanceHDR in the past. The results, however, were not really to my taste. It required some extra fiddling with Gimp to get a reasonably pleasing image.
It required some more work to get Photomatix working under my Gentoo
Linux distribution. The packages provided by HDRsoft, are compiled for
Ubuntu 16.04. Usually, I download the .deb file and convert it to a
.tar.gz with Alien. Then, I unpack
the tar-Archive into the Gentoo directory tree. This works for
instance for
Aftershot3
or the Atom Editor. Not so with Photomatix. The
required versions of the Jpeg and Tiff libraries didn’t match those on
the Gentoo system. After extracting the libraries from an appropriate
Ubuntu image and installing them into the Photomatix installation
directory, I immediately received a segmentation fault.
I resolved this problem by using a docker
container installed with an Ubuntu image. After installing all the
required software (the image format libs, the Gtk and Gnome libraries,
etc) in the container, Photomatix would start at least. Unfortunately
entering the license code still didn’t work. Some tracing with
strace from outside the container revealed, that the dbus-x11
package (containing the command dbus-launch) was still
missing. After installing it, Photomatix now works fine from inside
the container.
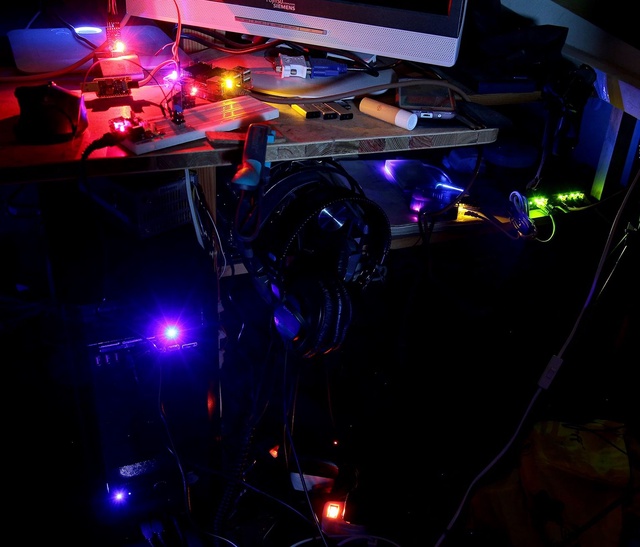
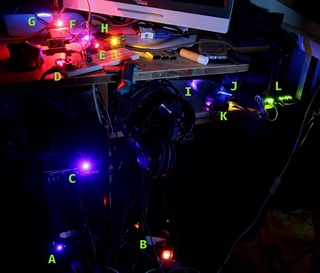
Time to produce an HDR image. The picture below created from 3 exposures, was taken in the completely unlit room. The computer monitors were switched off. The room is illuminated only by the LEDs installed on/in the various electronic devices.


The following devices provide enlightenment:
- A ⇒ Desktop PC power on LED, harddisk activity LED to the right
- B ⇒ Switches of the extension power cord
- C ⇒ Power LED of the multi-card reader 5" slot module
- D ⇒ Power LED of the breadboard 3.3/5V power supply
- E ⇒ Power LED ESP8266-1
- F ⇒ USB-to-Serial converter with CP2104
- G ⇒ Wacom Bamboo tablet
- H ⇒ Hardkernel Odroid C2 with red power LED, blinking blue watchdog timer LED (which tints the red LED slightly purple) and a yellow LED for Gigabit Ethernet
- I ⇒ 320Gb SATA harddisk, runs Arch Linux for the Odroid C1
- J ⇒ Powered USB-2 hub, provides power to the harddisk
- K ⇒ Hardkernel Odroid C1 with LED combination as the C2 board
- L ⇒ 8-Port Gigabit switch
